> ## Documentation Index
> Fetch the complete documentation index at: https://docs-v2-staging.qbraid.com/llms.txt
> Use this file to discover all available pages before exploring further.
> ## Agent Instructions
> Prefer the qBraid CLI for programmatic platform actions: pip install 'qbraid-cli>=0.12', then run `qbraid configure` once with an API key from https://account.qbraid.com/account/api-keys.
> Always install the latest packages (pip install -U qbraid qbraid-cli); do not pin versions from memory. qbraid-cli below 0.12.0 is incompatible with the current API.
> Device IDs use the QRN format vendor:provider:type:name (e.g. qbraid:qbraid:sim:qir-sv, rigetti:rigetti:qpu:cepheus-1-108q). Legacy underscore IDs are deprecated.
> The REST API base URL is https://api-v2.qbraid.com/api/v1, authenticated with an X-API-Key header.
> Free simulators cost no credits; QPU and GPU jobs consume credits. Surface the estimated cost to the user before submitting a paid job.
> For account signup, API keys, credits, and end-to-end action recipes, see https://qbraid.com/llms.txt.
# Files
> Open, create, rename, delete, and download files in the qBraid Lab file browser, and see how file sync differs on subscription and on-demand instances.
## File Browser
The file browser and Files menu enable you to work with files and directories on your system. This includes opening, creating,
deleting, renaming, downloading, and copying files and directories. To open the file browser, click on the "Folder"
icon in the left sidebar (or use shortcut `Cmd+Shift+F`).
The file system can be navigated by double-clicking on folders in the listing or clicking on the folders at the top of the
directory listing. To open any file, double-click on its name, or drag the file into the main work area to create a new tab.
### Show hidden files
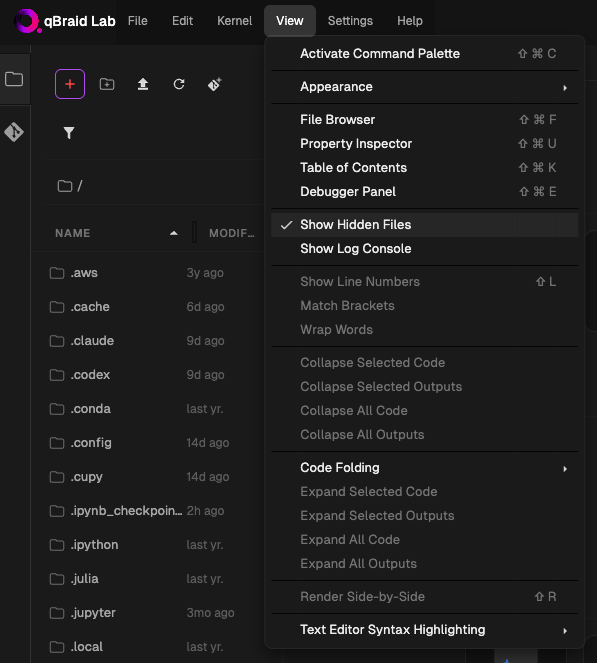
Hidden files are those whose names start with a "`.`" (e.g., `.bashrc`, `.gitignore`). These are hidden by default in the file browser to reduce clutter.
From the top-bar menu, click on **View**, and then select **Show Hidden Files** to toggle the visibility of hidden files in
the file browser.
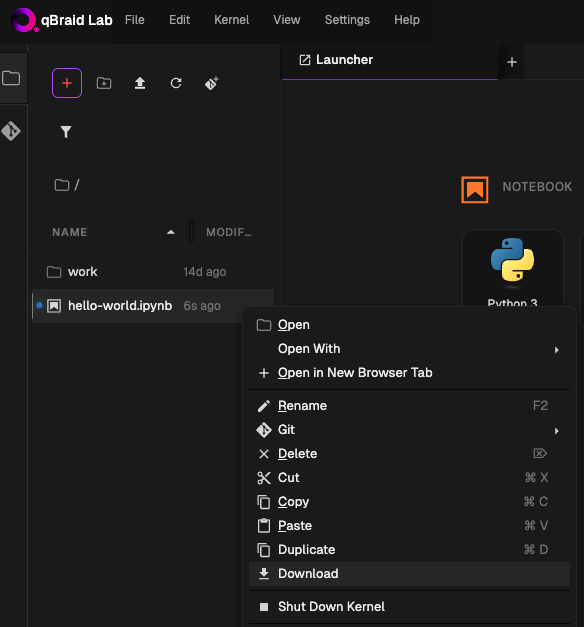
 ### Download files
To download a file, open the file browser, right click on the file, and select **Download** from the context menu.
If you can't launch Lab, you can still [download your files from the account
dashboard](https://docs-v2-staging.qbraid.com/v2/account/usage#download-your-files) without starting a session.
### Delete files and directories
To delete a file or directory, open the file browser, right-click on the item, and select **Delete** from the context menu.
You can also delete files and directories from the terminal using the `rm` command:
```bash
rm -rf [file_or_directory]
```
qBraid Lab has no trash or recovery folder. Files deleted from the file browser or with `rm -rf` are removed immediately and cannot be restored. Double-check the item before confirming a deletion or running the command.
If you need to keep a recoverable copy, download the file first (see [Download files](#download-files)) or push it to a remote Git repository before deleting.
If you are deleting files to free up disk space, see [Disk Usage Management](https://docs-v2-staging.qbraid.com/v2/lab/user-guide/usage-limits#disk-usage-management) for how to find large files and directories with `gdu` and how uninstalling unused environments can reclaim the most space.
### Download directories
Downloading directories is not currently supported by the JupyterLab file browser. However, as a workaround, you can use the
terminal to zip the directory and then download the zip file.
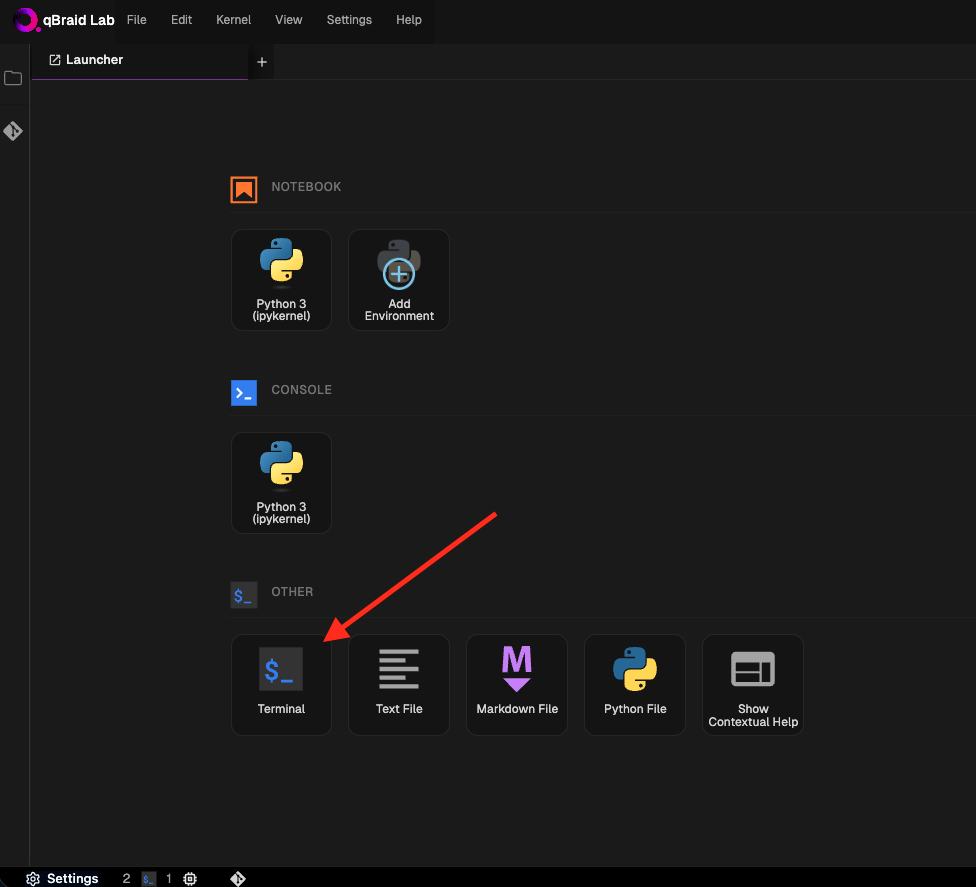
First, open terminal in JupyterLab by opening a Launcher tab and selecting **Terminal** under the **Other** section.
Then, compress the directory using the `zip` command, specifying both the target directory's path and the desired name for the
resulting zip file. The `-r` option is essential as it instructs zip to include all subdirectories and their contents
recursively. The general command format is as follows:
```bash
$ zip -r output_filename.zip /path/to/directory
```
Finally, download the zip file using the file browser. See [Download files](#download-files).
## File Sync (Subscription Instances)
If your subscription Lab instance has been inactive for a few days, your files will be restored from cloud storage when you start a new session. A progress indicator appears above the file browser in the left sidebar while the sync is in progress.
Please be patient as your files repopulate — this may take a few moments
depending on the size of your directory. Once the sync is complete, refresh
the **Environments** sidebar to see all of your environments again.
## Files on On-Demand Instances
On-demand instances (GPUs and high-spec CPUs) handle file persistence differently from subscription instances:
- **No automatic sync**: On-demand instances do not automatically sync files from cloud storage when launched. Each instance has its own independent disk.
- **Download available**: You can download files from your cloud storage into an on-demand instance using the Files tab, but changes are **not synced back** to cloud storage.
- **Stop preserves files**: Stopping an instance keeps your disk and all files intact. When you resume, everything is where you left it.
- **Terminate deletes files**: Terminating an instance permanently deletes the disk and all files on it.
Before terminating an on-demand instance, download any important files to your
local machine or push them to a remote repository. See [On-Demand
Instances](https://docs-v2-staging.qbraid.com/v2/lab/user-guide/on-demand-instances#file-persistence) for more
details.
### Download files
To download a file, open the file browser, right click on the file, and select **Download** from the context menu.
If you can't launch Lab, you can still [download your files from the account
dashboard](https://docs-v2-staging.qbraid.com/v2/account/usage#download-your-files) without starting a session.
### Delete files and directories
To delete a file or directory, open the file browser, right-click on the item, and select **Delete** from the context menu.
You can also delete files and directories from the terminal using the `rm` command:
```bash
rm -rf [file_or_directory]
```
qBraid Lab has no trash or recovery folder. Files deleted from the file browser or with `rm -rf` are removed immediately and cannot be restored. Double-check the item before confirming a deletion or running the command.
If you need to keep a recoverable copy, download the file first (see [Download files](#download-files)) or push it to a remote Git repository before deleting.
If you are deleting files to free up disk space, see [Disk Usage Management](https://docs-v2-staging.qbraid.com/v2/lab/user-guide/usage-limits#disk-usage-management) for how to find large files and directories with `gdu` and how uninstalling unused environments can reclaim the most space.
### Download directories
Downloading directories is not currently supported by the JupyterLab file browser. However, as a workaround, you can use the
terminal to zip the directory and then download the zip file.
First, open terminal in JupyterLab by opening a Launcher tab and selecting **Terminal** under the **Other** section.
Then, compress the directory using the `zip` command, specifying both the target directory's path and the desired name for the
resulting zip file. The `-r` option is essential as it instructs zip to include all subdirectories and their contents
recursively. The general command format is as follows:
```bash
$ zip -r output_filename.zip /path/to/directory
```
Finally, download the zip file using the file browser. See [Download files](#download-files).
## File Sync (Subscription Instances)
If your subscription Lab instance has been inactive for a few days, your files will be restored from cloud storage when you start a new session. A progress indicator appears above the file browser in the left sidebar while the sync is in progress.
Please be patient as your files repopulate — this may take a few moments
depending on the size of your directory. Once the sync is complete, refresh
the **Environments** sidebar to see all of your environments again.
## Files on On-Demand Instances
On-demand instances (GPUs and high-spec CPUs) handle file persistence differently from subscription instances:
- **No automatic sync**: On-demand instances do not automatically sync files from cloud storage when launched. Each instance has its own independent disk.
- **Download available**: You can download files from your cloud storage into an on-demand instance using the Files tab, but changes are **not synced back** to cloud storage.
- **Stop preserves files**: Stopping an instance keeps your disk and all files intact. When you resume, everything is where you left it.
- **Terminate deletes files**: Terminating an instance permanently deletes the disk and all files on it.
Before terminating an on-demand instance, download any important files to your
local machine or push them to a remote repository. See [On-Demand
Instances](https://docs-v2-staging.qbraid.com/v2/lab/user-guide/on-demand-instances#file-persistence) for more
details.