> ## Documentation Index
> Fetch the complete documentation index at: https://docs-v2-staging.qbraid.com/llms.txt
> Use this file to discover all available pages before exploring further.
> ## Agent Instructions
> Prefer the qBraid CLI for programmatic platform actions: pip install 'qbraid-cli>=0.12', then run `qbraid configure` once with an API key from https://account.qbraid.com/account/api-keys.
> Always install the latest packages (pip install -U qbraid qbraid-cli); do not pin versions from memory. qbraid-cli below 0.12.0 is incompatible with the current API.
> Device IDs use the QRN format vendor:provider:type:name (e.g. qbraid:qbraid:sim:qir-sv, rigetti:rigetti:qpu:cepheus-1-108q). Legacy underscore IDs are deprecated.
> The REST API base URL is https://api-v2.qbraid.com/api/v1, authenticated with an X-API-Key header.
> Free simulators cost no credits; QPU and GPU jobs consume credits. Surface the estimated cost to the user before submitting a paid job.
> For account signup, API keys, credits, and end-to-end action recipes, see https://qbraid.com/llms.txt.
_A platform-agnostic quantum runtime framework._
The qBraid-SDK is a platform-agnostic quantum runtime framework designed for both quantum software and hardware providers.
This Python-based tool streamlines the full lifecycle management of quantum jobs—from defining program specifications to job
submission, and through to the post-processing and visualization of results.
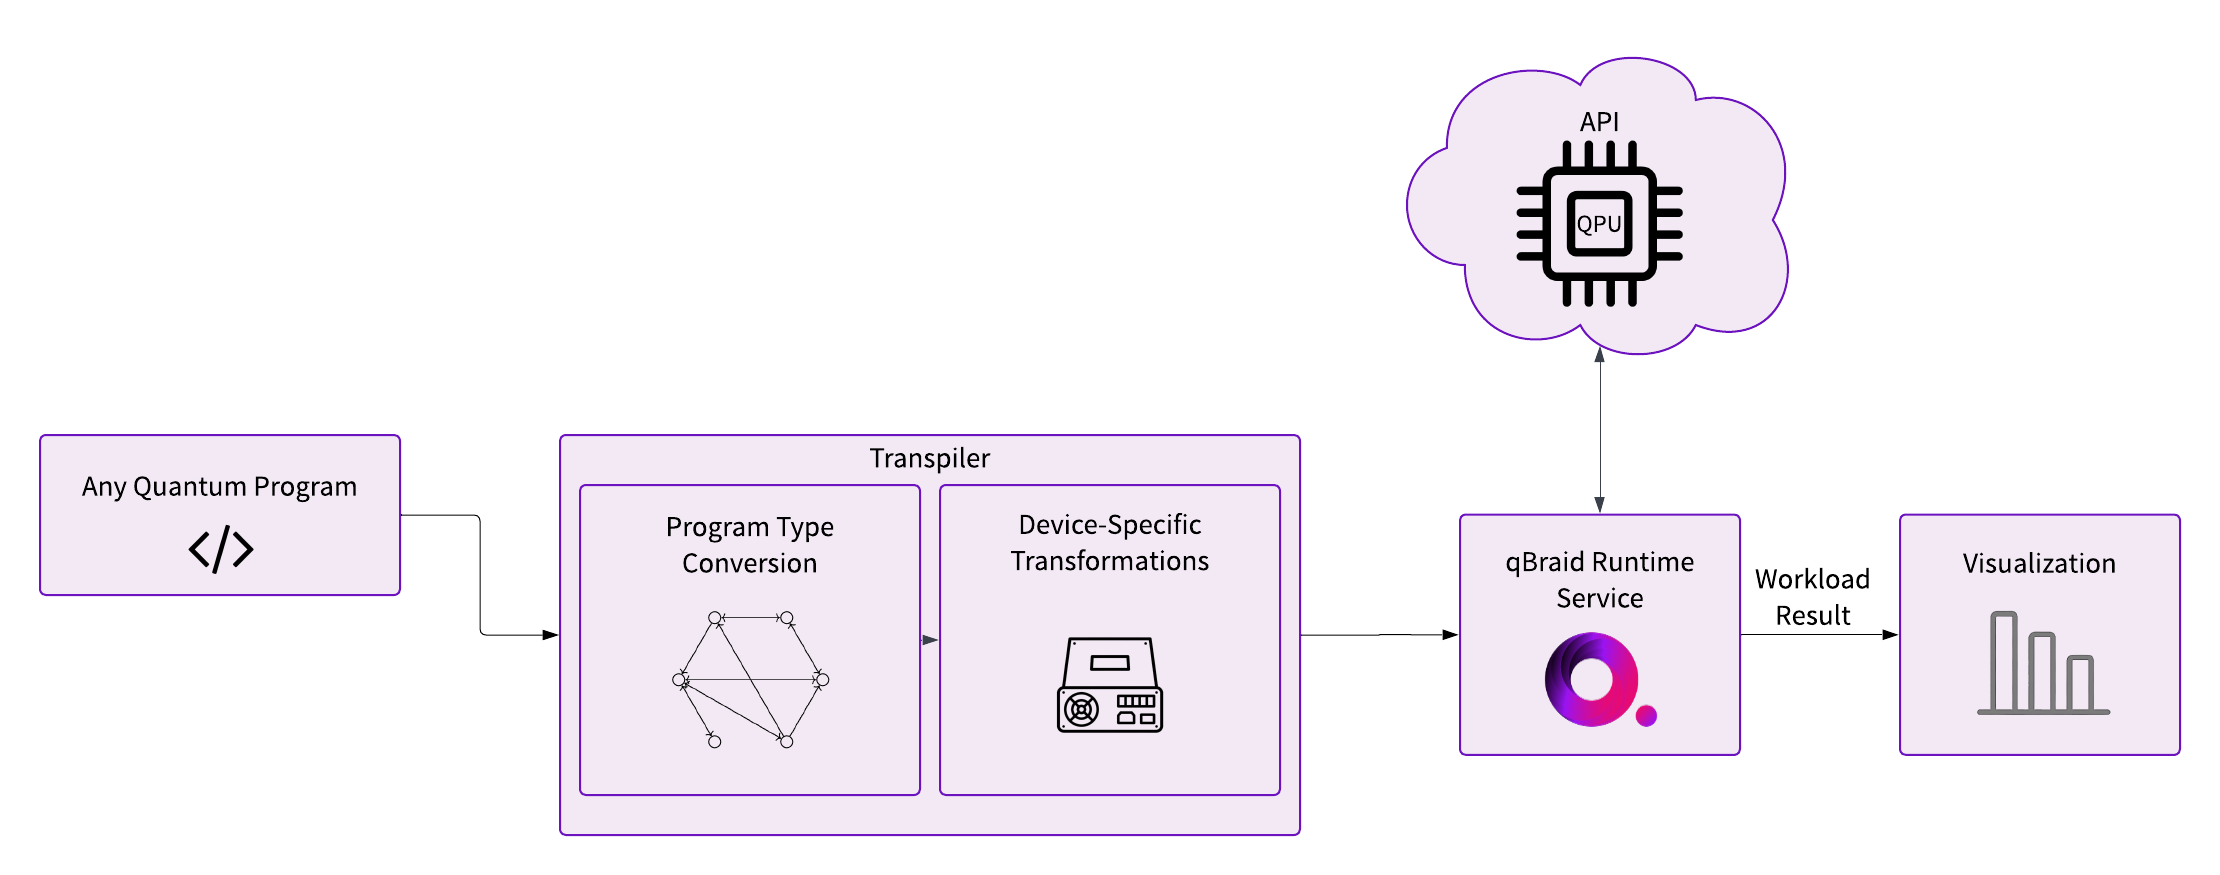
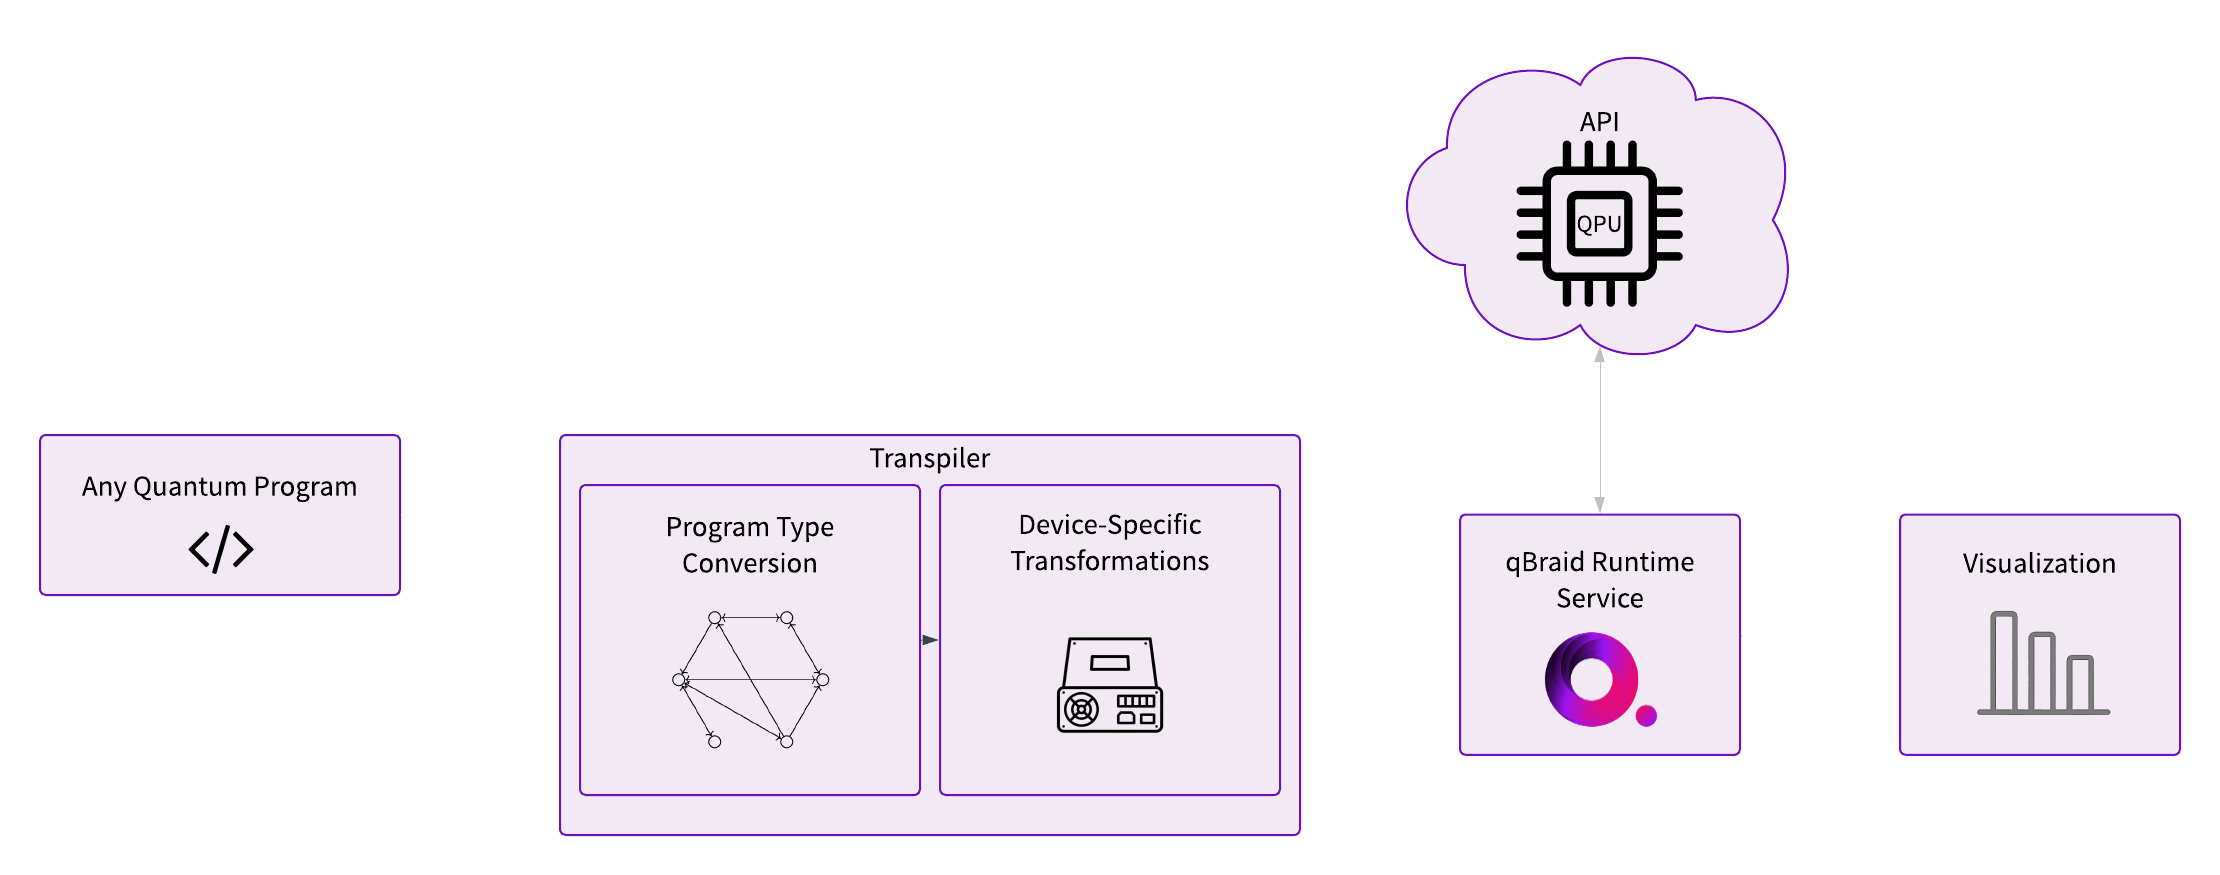 Distinguishing itself through a streamlined and
highly-configurable approach to cross-platform integration, the qBraid-SDK _does not assume a fixed target software framework_.
Instead, it allows providers to dynamically register any desired run input program type as the target, depending on their specific needs.
These program types are interconnected via a graph-based transpiler, where each program type is represented as a node and supported
conversions as edges. The breadth, depth, and connectivity of this `ConversionGraph` can be customized by the provider.
The framework also facilitates the insertion of additional program validations, circuit transformations, and transpiler/compiler steps
into its modular pipeline through a comprehensive `TargetProfile`. This profile encapsulates both device properties (such as number of
qubits, maximum shots, native gate set) and the software requirements (`ProgramSpec`) needed to submit a job, vastly reducing the overhead
and redundancy typically associated with cross-platform integrations in quantum computing.
## Key Features
### 1. Quantum Program Integration
Offers native support for 10+ major quantum programming libraries including 20+ inter-library conversions with the ability to
dynamically register new program types and conversions on the fly. This enables flexible program submissions to cater to the unique capabilities and constraints of your preferred framework, facilitated by a unique conversion map that automatically adapts quantum programs during runtime according to the given specifications.
### 2. Modular Design
- `qbraid.programs`: Extracts and manages metadata from supported quantum program types, with the flexibility to introduce new types.
- `qbraid.transpiler`: Bridges different quantum programming IRs through native and customizable circuit conversions.
- `qbraid.passes`: Ensures quantum programs conform to hardware specifications through essential runtime transformations.
- `qbraid.runtime`: Defines essential abstractions for providers, devices, jobs, and results, integrated through a coherent runtime profile.
- `qbraid.visualization`: Provides tools for visualizing quantum circuits and experimental data, enhancing data interpretation.
### 3. Extensibility and Customization
The framework encourages community contributions and extensions, supporting an evolving ecosystem of program types and conversions, adaptable to specific provider needs. By providing a comprehensive runtime solution, the qBraid-SDK offers significant advantages to _both hardware and software providers_:
- **Reduces Overhead**: Minimizes the effort required to develop client-side applications for securely submitting and managing quantum experiments remotely.
- **Enhances Integration**: Facilitates seamless integration and interoperability of quantum software tools across all layers of the stack.
- **Broad Compatibility**: Supports a diverse range of API complexities, catering to both established players like IBM and AWS as well as emerging providers.
## Installation and Setup
For the best experience, install the qBraid SDK on [lab.qbraid.com](https://lab.qbraid.com/). Login (or create an account) on
[account.qbraid.com](https://account.qbraid.com/) and then follow the steps to [install an environment](https://docs-v2-staging.qbraid.com/v2/lab/user-guide/environments/#install-environment).
Using the SDK on qBraid Lab means direct, pre-configured access to QPUs from IonQ, Oxford Quantum Circuits, QuEra, Rigetti, IQM, Pasqal, and Quantinuum
as well as on-demand simulators from AWS, IonQ, QuEra, qBraid, Quantinuum, Pasqal, NEC, and Equal-1 (access varies based on account, see [pricing](https://docs-v2-staging.qbraid.com/v2/home/pricing)).
See [qBraid Quantum Jobs](https://docs-v2-staging.qbraid.com/v2/lab/user-guide/quantum-jobs) for more.
### Local Installation
The qBraid-SDK, and all of its dependencies, can be installed using [pip](https://pypi.org/project/qbraid/):
```bash
pip install qbraid
```
You can also install from source by cloning the [GitHub repository](https://github.com/qBraid/qBraid) and running a
pip install command in the root directory:
```bash
git clone https://github.com/qBraid/qBraid.git
cd qBraid
pip install .
```
*Note*: The qBraid-SDK requires Python 3.10 or greater.
To use qBraid runtime locally, you must also install the necessary extras and configure your
account credentials according to the device(s) that you are targeting. Follow the linked,
provider-specific, instructions for the [QbraidProvider](https://docs-v2-staging.qbraid.com/v2/sdk/user-guide/providers/native),
[BraketProvider](https://docs-v2-staging.qbraid.com/v2/sdk/user-guide/providers/aws), [QiskitRuntimeProvider](https://docs-v2-staging.qbraid.com/v2/sdk/user-guide/providers/ibm),
[IonQProvider](https://docs-v2-staging.qbraid.com/v2/sdk/user-guide/providers/ionq), [OQCProvider](https://docs-v2-staging.qbraid.com/v2/sdk/user-guide/providers/oqc),
[AzureQuantumProvider](https://docs-v2-staging.qbraid.com/v2/sdk/user-guide/providers/azure), [QuantinuumProvider](https://docs-v2-staging.qbraid.com/v2/sdk/user-guide/providers/quantinuum),
[RigettiProvider](https://docs-v2-staging.qbraid.com/v2/sdk/user-guide/providers/rigetti), and [OriginProvider](https://docs-v2-staging.qbraid.com/v2/sdk/user-guide/providers/origin) as applicable.
## Quickstart
### Transpiler
Construct a quantum program of any supported program type:
Below, `QPROGRAM_REGISTRY` maps shorthand identifiers for supported quantum programs, each corresponding to a type in the typed
`QPROGRAM` Union. For example, 'qiskit' maps to `qiskit.QuantumCircuit` in `QPROGRAM`. Notably, 'qasm2' and 'qasm3' both represent
raw OpenQASM strings. This arrangement simplifies targeting and transpiling between different quantum programming frameworks.
```python
>>> from qbraid import QPROGRAM_REGISTRY
>>> QPROGRAM_REGISTRY
{'cirq': cirq.circuits.circuit.Circuit,
'qiskit': qiskit.circuit.quantumcircuit.QuantumCircuit,
'pennylane': pennylane.tape.tape.QuantumTape,
'pyquil': pyquil.quil.Program,
'pytket': pytket._tket.circuit.Circuit,
'braket': braket.circuits.circuit.Circuit,
'braket_ahs': braket.ahs.analog_hamiltonian_simulation.AnalogHamiltonianSimulation,
'openqasm3': openqasm3.ast.Program,
'pyqir': pyqir.Module,
'cpp_pyqubo': cpp_pyqubo.Model,
'qasm2': str,
'qasm3': str,
'qasm2_kirin': str,
'ionq': qbraid.programs.typer.IonQDict,
'qubo': qbraid.programs.typer.QuboCoefficientsDict,
'bloqade': bloqade.analog.builder.assign.BatchAssign,
'cudaq': cudaq.kernel.kernel_builder.PyKernel,
'qibo': qibo.models.circuit.Circuit,
'stim': stim._stim_sse2.Circuit,
'pulser': pulser.sequence.sequence.Sequence,
'pyqpanda3': pyqpanda3.core.QProg,
'autoqasm': autoqasm.program.program.Program,
'qrisp': qrisp.circuit.quantum_circuit.QuantumCircuit,
'qat': qat.core.wrappers.circuit.Circuit}
```
Pass any registered quantum program along with a target package from
`QPROGRAM_REGISTRY` to "transpile" your circuit to a new program type:
```python Input
from qbraid import random_circuit, transpile
from qbraid.interface import circuits_allclose
qiskit_ckt = random_circuit("qiskit")
cirq_ckt = transpile(qiskit_ckt, "cirq")
allclose = circuits_allclose(qiskit_ckt, cirq_ckt)
print(f"{type(qiskit_ckt)}\n{qiskit_ckt}\n")
print(f"{type(cirq_ckt)}\n{cirq_ckt}\n")
print(f"Circuits All Close: {allclose}")
```
```text Output
┌────────────┐
q_0: ──■──┤ Rx(3.0353) ├
┌─┴─┐└───┬────┬───┘
q_1: ┤ H ├────┤ √X ├────
└───┘ └────┘
0: ───@───Rx(0.966π)───
│
1: ───H───X^0.5────────
Circuits All Close: True
```
### Conversions
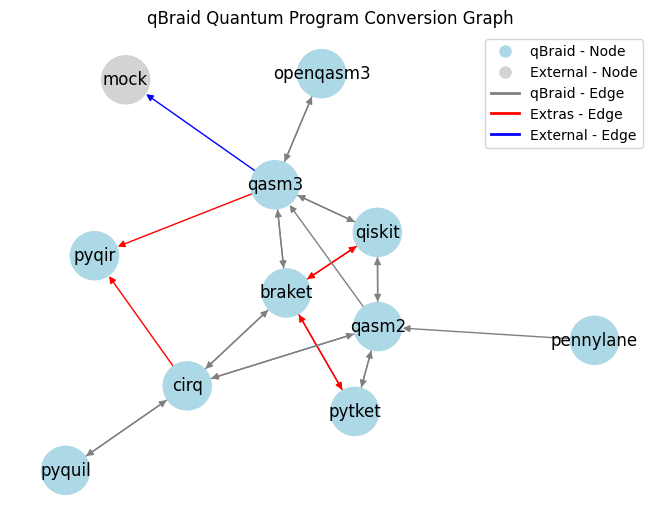
Behind the scenes, the qBraid-SDK uses [rustworkx](https://www.rustworkx.org/) to create a directional graph that maps all
possible conversions between supported program types:
```python
from qbraid import ConversionGraph, ExperimentType
# Loads native conversions from QPROGRAM_REGISTRY
graph = ConversionGraph()
# Plot GATE_MODEL nodes and "Conversion" edges
graph.plot(experiment_type=ExperimentType.GATE_MODEL, legend=True)
```
Distinguishing itself through a streamlined and
highly-configurable approach to cross-platform integration, the qBraid-SDK _does not assume a fixed target software framework_.
Instead, it allows providers to dynamically register any desired run input program type as the target, depending on their specific needs.
These program types are interconnected via a graph-based transpiler, where each program type is represented as a node and supported
conversions as edges. The breadth, depth, and connectivity of this `ConversionGraph` can be customized by the provider.
The framework also facilitates the insertion of additional program validations, circuit transformations, and transpiler/compiler steps
into its modular pipeline through a comprehensive `TargetProfile`. This profile encapsulates both device properties (such as number of
qubits, maximum shots, native gate set) and the software requirements (`ProgramSpec`) needed to submit a job, vastly reducing the overhead
and redundancy typically associated with cross-platform integrations in quantum computing.
## Key Features
### 1. Quantum Program Integration
Offers native support for 10+ major quantum programming libraries including 20+ inter-library conversions with the ability to
dynamically register new program types and conversions on the fly. This enables flexible program submissions to cater to the unique capabilities and constraints of your preferred framework, facilitated by a unique conversion map that automatically adapts quantum programs during runtime according to the given specifications.
### 2. Modular Design
- `qbraid.programs`: Extracts and manages metadata from supported quantum program types, with the flexibility to introduce new types.
- `qbraid.transpiler`: Bridges different quantum programming IRs through native and customizable circuit conversions.
- `qbraid.passes`: Ensures quantum programs conform to hardware specifications through essential runtime transformations.
- `qbraid.runtime`: Defines essential abstractions for providers, devices, jobs, and results, integrated through a coherent runtime profile.
- `qbraid.visualization`: Provides tools for visualizing quantum circuits and experimental data, enhancing data interpretation.
### 3. Extensibility and Customization
The framework encourages community contributions and extensions, supporting an evolving ecosystem of program types and conversions, adaptable to specific provider needs. By providing a comprehensive runtime solution, the qBraid-SDK offers significant advantages to _both hardware and software providers_:
- **Reduces Overhead**: Minimizes the effort required to develop client-side applications for securely submitting and managing quantum experiments remotely.
- **Enhances Integration**: Facilitates seamless integration and interoperability of quantum software tools across all layers of the stack.
- **Broad Compatibility**: Supports a diverse range of API complexities, catering to both established players like IBM and AWS as well as emerging providers.
## Installation and Setup
For the best experience, install the qBraid SDK on [lab.qbraid.com](https://lab.qbraid.com/). Login (or create an account) on
[account.qbraid.com](https://account.qbraid.com/) and then follow the steps to [install an environment](https://docs-v2-staging.qbraid.com/v2/lab/user-guide/environments/#install-environment).
Using the SDK on qBraid Lab means direct, pre-configured access to QPUs from IonQ, Oxford Quantum Circuits, QuEra, Rigetti, IQM, Pasqal, and Quantinuum
as well as on-demand simulators from AWS, IonQ, QuEra, qBraid, Quantinuum, Pasqal, NEC, and Equal-1 (access varies based on account, see [pricing](https://docs-v2-staging.qbraid.com/v2/home/pricing)).
See [qBraid Quantum Jobs](https://docs-v2-staging.qbraid.com/v2/lab/user-guide/quantum-jobs) for more.
### Local Installation
The qBraid-SDK, and all of its dependencies, can be installed using [pip](https://pypi.org/project/qbraid/):
```bash
pip install qbraid
```
You can also install from source by cloning the [GitHub repository](https://github.com/qBraid/qBraid) and running a
pip install command in the root directory:
```bash
git clone https://github.com/qBraid/qBraid.git
cd qBraid
pip install .
```
*Note*: The qBraid-SDK requires Python 3.10 or greater.
To use qBraid runtime locally, you must also install the necessary extras and configure your
account credentials according to the device(s) that you are targeting. Follow the linked,
provider-specific, instructions for the [QbraidProvider](https://docs-v2-staging.qbraid.com/v2/sdk/user-guide/providers/native),
[BraketProvider](https://docs-v2-staging.qbraid.com/v2/sdk/user-guide/providers/aws), [QiskitRuntimeProvider](https://docs-v2-staging.qbraid.com/v2/sdk/user-guide/providers/ibm),
[IonQProvider](https://docs-v2-staging.qbraid.com/v2/sdk/user-guide/providers/ionq), [OQCProvider](https://docs-v2-staging.qbraid.com/v2/sdk/user-guide/providers/oqc),
[AzureQuantumProvider](https://docs-v2-staging.qbraid.com/v2/sdk/user-guide/providers/azure), [QuantinuumProvider](https://docs-v2-staging.qbraid.com/v2/sdk/user-guide/providers/quantinuum),
[RigettiProvider](https://docs-v2-staging.qbraid.com/v2/sdk/user-guide/providers/rigetti), and [OriginProvider](https://docs-v2-staging.qbraid.com/v2/sdk/user-guide/providers/origin) as applicable.
## Quickstart
### Transpiler
Construct a quantum program of any supported program type:
Below, `QPROGRAM_REGISTRY` maps shorthand identifiers for supported quantum programs, each corresponding to a type in the typed
`QPROGRAM` Union. For example, 'qiskit' maps to `qiskit.QuantumCircuit` in `QPROGRAM`. Notably, 'qasm2' and 'qasm3' both represent
raw OpenQASM strings. This arrangement simplifies targeting and transpiling between different quantum programming frameworks.
```python
>>> from qbraid import QPROGRAM_REGISTRY
>>> QPROGRAM_REGISTRY
{'cirq': cirq.circuits.circuit.Circuit,
'qiskit': qiskit.circuit.quantumcircuit.QuantumCircuit,
'pennylane': pennylane.tape.tape.QuantumTape,
'pyquil': pyquil.quil.Program,
'pytket': pytket._tket.circuit.Circuit,
'braket': braket.circuits.circuit.Circuit,
'braket_ahs': braket.ahs.analog_hamiltonian_simulation.AnalogHamiltonianSimulation,
'openqasm3': openqasm3.ast.Program,
'pyqir': pyqir.Module,
'cpp_pyqubo': cpp_pyqubo.Model,
'qasm2': str,
'qasm3': str,
'qasm2_kirin': str,
'ionq': qbraid.programs.typer.IonQDict,
'qubo': qbraid.programs.typer.QuboCoefficientsDict,
'bloqade': bloqade.analog.builder.assign.BatchAssign,
'cudaq': cudaq.kernel.kernel_builder.PyKernel,
'qibo': qibo.models.circuit.Circuit,
'stim': stim._stim_sse2.Circuit,
'pulser': pulser.sequence.sequence.Sequence,
'pyqpanda3': pyqpanda3.core.QProg,
'autoqasm': autoqasm.program.program.Program,
'qrisp': qrisp.circuit.quantum_circuit.QuantumCircuit,
'qat': qat.core.wrappers.circuit.Circuit}
```
Pass any registered quantum program along with a target package from
`QPROGRAM_REGISTRY` to "transpile" your circuit to a new program type:
```python Input
from qbraid import random_circuit, transpile
from qbraid.interface import circuits_allclose
qiskit_ckt = random_circuit("qiskit")
cirq_ckt = transpile(qiskit_ckt, "cirq")
allclose = circuits_allclose(qiskit_ckt, cirq_ckt)
print(f"{type(qiskit_ckt)}\n{qiskit_ckt}\n")
print(f"{type(cirq_ckt)}\n{cirq_ckt}\n")
print(f"Circuits All Close: {allclose}")
```
```text Output
┌────────────┐
q_0: ──■──┤ Rx(3.0353) ├
┌─┴─┐└───┬────┬───┘
q_1: ┤ H ├────┤ √X ├────
└───┘ └────┘
0: ───@───Rx(0.966π)───
│
1: ───H───X^0.5────────
Circuits All Close: True
```
### Conversions
Behind the scenes, the qBraid-SDK uses [rustworkx](https://www.rustworkx.org/) to create a directional graph that maps all
possible conversions between supported program types:
```python
from qbraid import ConversionGraph, ExperimentType
# Loads native conversions from QPROGRAM_REGISTRY
graph = ConversionGraph()
# Plot GATE_MODEL nodes and "Conversion" edges
graph.plot(experiment_type=ExperimentType.GATE_MODEL, legend=True)
```
 You can use the native conversions supported by qBraid, or define your own custom nodes and/or edges. For example:
```python
from unittest.mock import Mock
from qbraid import register_program_type, Conversion
# replace with any program type
register_program_type(Mock, alias="mock")
# replace with your custom conversion function
example_qasm3_to_mock_func = lambda x: x
conversion = Conversion("qasm3", "mock", example_qasm3_to_mock_func)
graph.add_conversion(conversion)
# filter ConversionGraph to include only GATE_MODEL nodes
graph = graph.subplot(ExperimentType.GATE_MODEL)
# using a seed is helpful to ensure reproducibility
graph.plot(seed=20, k=3, legend=True)
```
You can use the native conversions supported by qBraid, or define your own custom nodes and/or edges. For example:
```python
from unittest.mock import Mock
from qbraid import register_program_type, Conversion
# replace with any program type
register_program_type(Mock, alias="mock")
# replace with your custom conversion function
example_qasm3_to_mock_func = lambda x: x
conversion = Conversion("qasm3", "mock", example_qasm3_to_mock_func)
graph.add_conversion(conversion)
# filter ConversionGraph to include only GATE_MODEL nodes
graph = graph.subplot(ExperimentType.GATE_MODEL)
# using a seed is helpful to ensure reproducibility
graph.plot(seed=20, k=3, legend=True)
```
 ### QbraidProvider
Run experiments using on-demand simulators provided by qBraid using the `qbraid.runtime.QbraidProvider`. You can get a
Python list of device objects using:
```python Input
from qbraid import QbraidProvider
provider = QbraidProvider()
devices = provider.get_devices()
print(devices)
```
```python Output
[,
,
,
,
,
,
,
,
,
,
,
,
,
,
,
,
,
,
,
,
]
```
Or, instantiate a known device by ID via the `QbraidProvider.get_device()` method,
and submit quantum jobs from any supported program type:
```python
device = provider.get_device("qbraid:qbraid:sim:qir-sv")
jobs = device.run([qiskit_ckt, braket_ckt, cirq_ckt, qasm3_str], shots=1000)
results = [job.result() for job in jobs]
print(results[0].data.get_counts())
# {'00': 483, '01': 14, '10': 486, '11': 17}
```
### Async results
All `QuantumJob` subclasses support `async_result()` for non-blocking result retrieval using asyncio.
This is useful in async applications where blocking the event loop is undesirable:
```python
result = await job.async_result(timeout=120, poll_interval=5)
print(result.data.get_counts())
```
## Supported Frontends
Featured circuit-building frameworks supported by the qBraid-SDK (non-exhaustive list).
## Citation
If you use qBraid-SDK in your research, we kindly request that you cite it appropriately.
The BibTeX entry below is aligned with the latest stable release. For the most up-to-date
citation details, please refer to [CITATION.cff](https://github.com/qBraid/qBraid/blob/main/CITATION.cff) or
[Zenodo](https://doi.org/10.5281/zenodo.12627596).
```tex
@software{Hill_qBraid-SDK_Platform-agnostic_quantum_2026,
author = {Hill, Ryan James and Gupta, Harshit and Young, Ricky and Setia, Kanav},
doi = {10.5281/zenodo.12627596},
license = {Apache-2.0},
month = jul,
title = {{qBraid-SDK: Platform-agnostic quantum runtime framework.}},
url = {https://github.com/qBraid/qBraid},
version = {0.12.2},
year = {2026}
}
```
### QbraidProvider
Run experiments using on-demand simulators provided by qBraid using the `qbraid.runtime.QbraidProvider`. You can get a
Python list of device objects using:
```python Input
from qbraid import QbraidProvider
provider = QbraidProvider()
devices = provider.get_devices()
print(devices)
```
```python Output
[,
,
,
,
,
,
,
,
,
,
,
,
,
,
,
,
,
,
,
,
]
```
Or, instantiate a known device by ID via the `QbraidProvider.get_device()` method,
and submit quantum jobs from any supported program type:
```python
device = provider.get_device("qbraid:qbraid:sim:qir-sv")
jobs = device.run([qiskit_ckt, braket_ckt, cirq_ckt, qasm3_str], shots=1000)
results = [job.result() for job in jobs]
print(results[0].data.get_counts())
# {'00': 483, '01': 14, '10': 486, '11': 17}
```
### Async results
All `QuantumJob` subclasses support `async_result()` for non-blocking result retrieval using asyncio.
This is useful in async applications where blocking the event loop is undesirable:
```python
result = await job.async_result(timeout=120, poll_interval=5)
print(result.data.get_counts())
```
## Supported Frontends
Featured circuit-building frameworks supported by the qBraid-SDK (non-exhaustive list).
## Citation
If you use qBraid-SDK in your research, we kindly request that you cite it appropriately.
The BibTeX entry below is aligned with the latest stable release. For the most up-to-date
citation details, please refer to [CITATION.cff](https://github.com/qBraid/qBraid/blob/main/CITATION.cff) or
[Zenodo](https://doi.org/10.5281/zenodo.12627596).
```tex
@software{Hill_qBraid-SDK_Platform-agnostic_quantum_2026,
author = {Hill, Ryan James and Gupta, Harshit and Young, Ricky and Setia, Kanav},
doi = {10.5281/zenodo.12627596},
license = {Apache-2.0},
month = jul,
title = {{qBraid-SDK: Platform-agnostic quantum runtime framework.}},
url = {https://github.com/qBraid/qBraid},
version = {0.12.2},
year = {2026}
}
```