

Intel® Quantum SDK
How to set up and use the Intel® Quantum SDK in qBraid Lab
Overview
The Intel® Quantum SDK is a C++-based platform for writing quantum programs as quantum kernels and
running them on Intel’s high-performance quantum simulators. On qBraid Lab it is available as a
self-contained, pre-built environment: the intel-quantum-compiler (LLVM/Clang based), the Intel
Quantum Simulator and other backends, the Python interface (intelqsdk.cbindings), and all of the
required Intel runtime libraries are bundled together, so there is nothing to build or configure
yourself.
To cite the Intel® Quantum SDK, please reference:
Khalate, P., Wu, X.-C., Premaratne, S., Hogaboam, J., Holmes, A., Schmitz, A., Guerreschi, G. G., Zou, X. & Matsuura, A. Y., arXiv:2202.11142 (2022)
Getting Started
The Intel® Quantum SDK environment is only available on the dedicated Intel Lab image. You must launch that image first; the environment then becomes visible in the Environment Manager, where you install it to get the Python virtual environment, the compiler, and the Jupyter kernel.
Launch the Intel image
On your qBraid Dashboard, find the Launch qBraid Lab card and select the Small · Intel Quantum SDK profile, then click Launch.
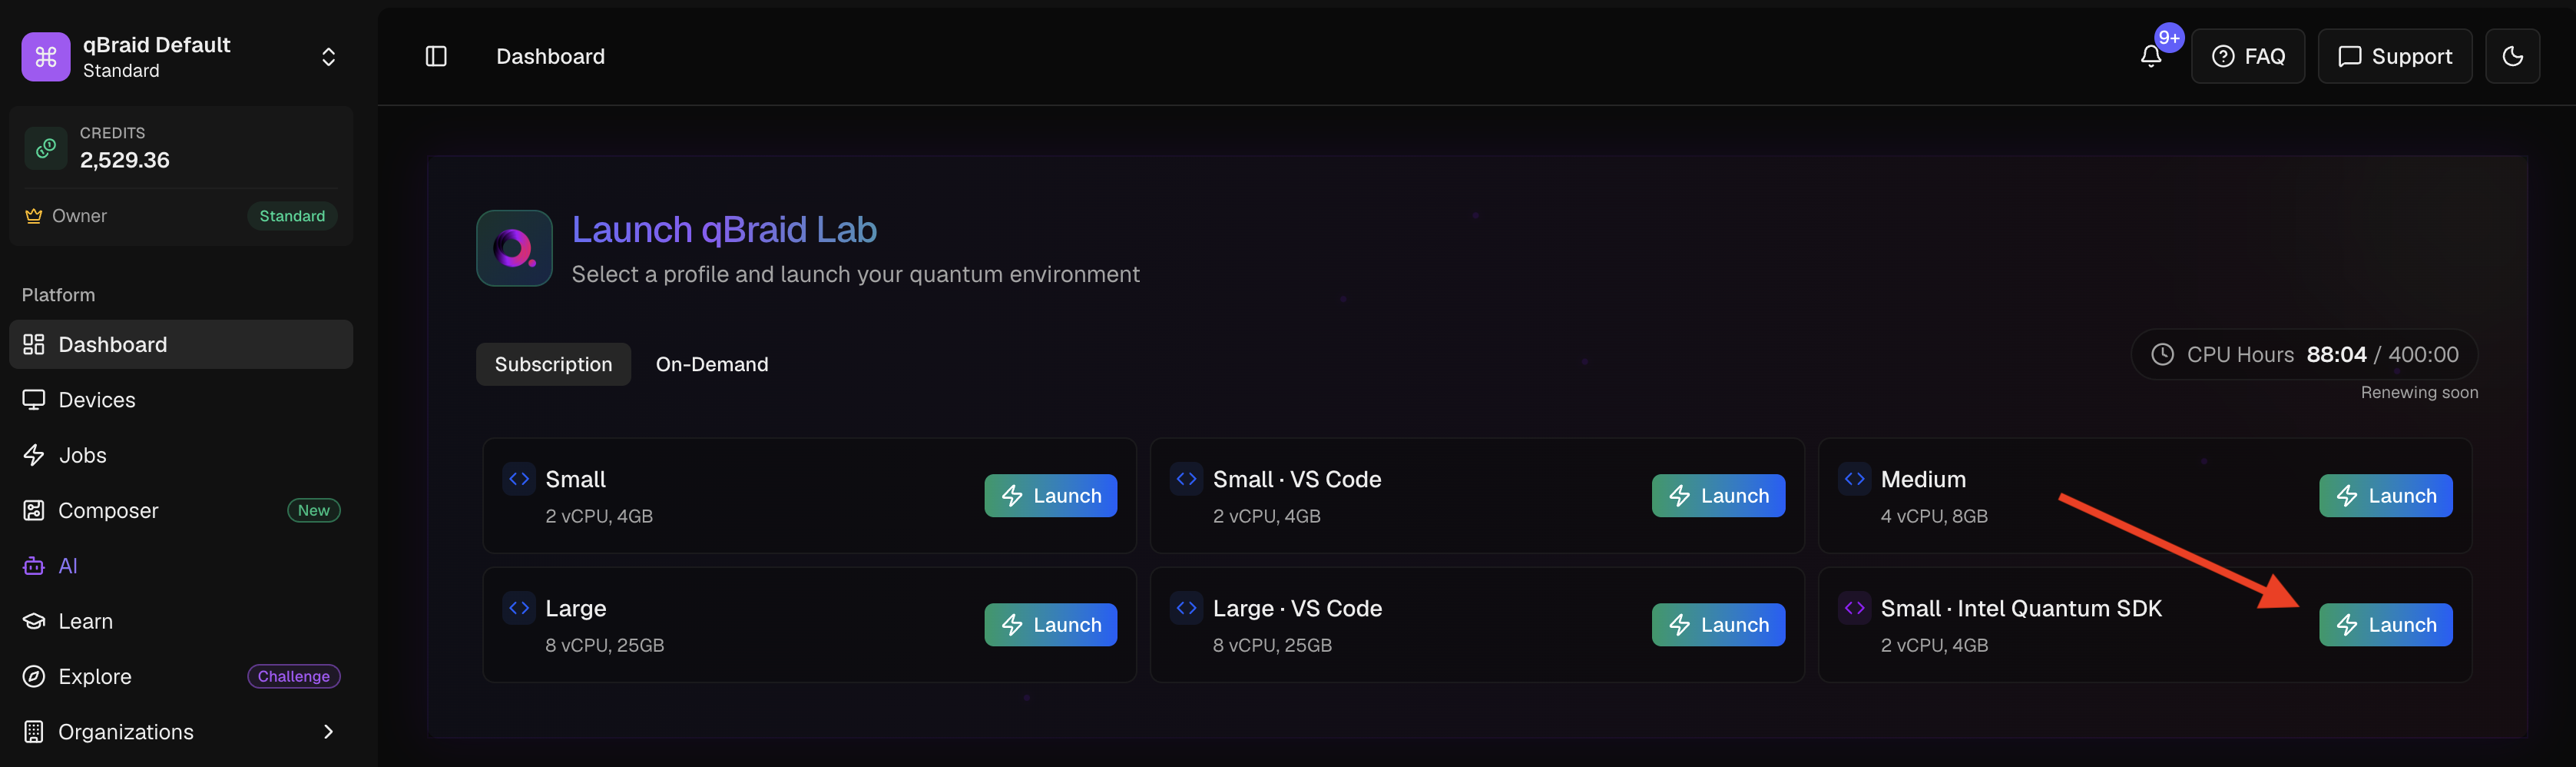
Pulling the Intel image may take 2-3 minutes the first time. The next time you launch Lab, it will load much more quickly.
Install the environment
-
In Lab, open the Environment Manager sidebar and click Add to browse the environments available to install.
-
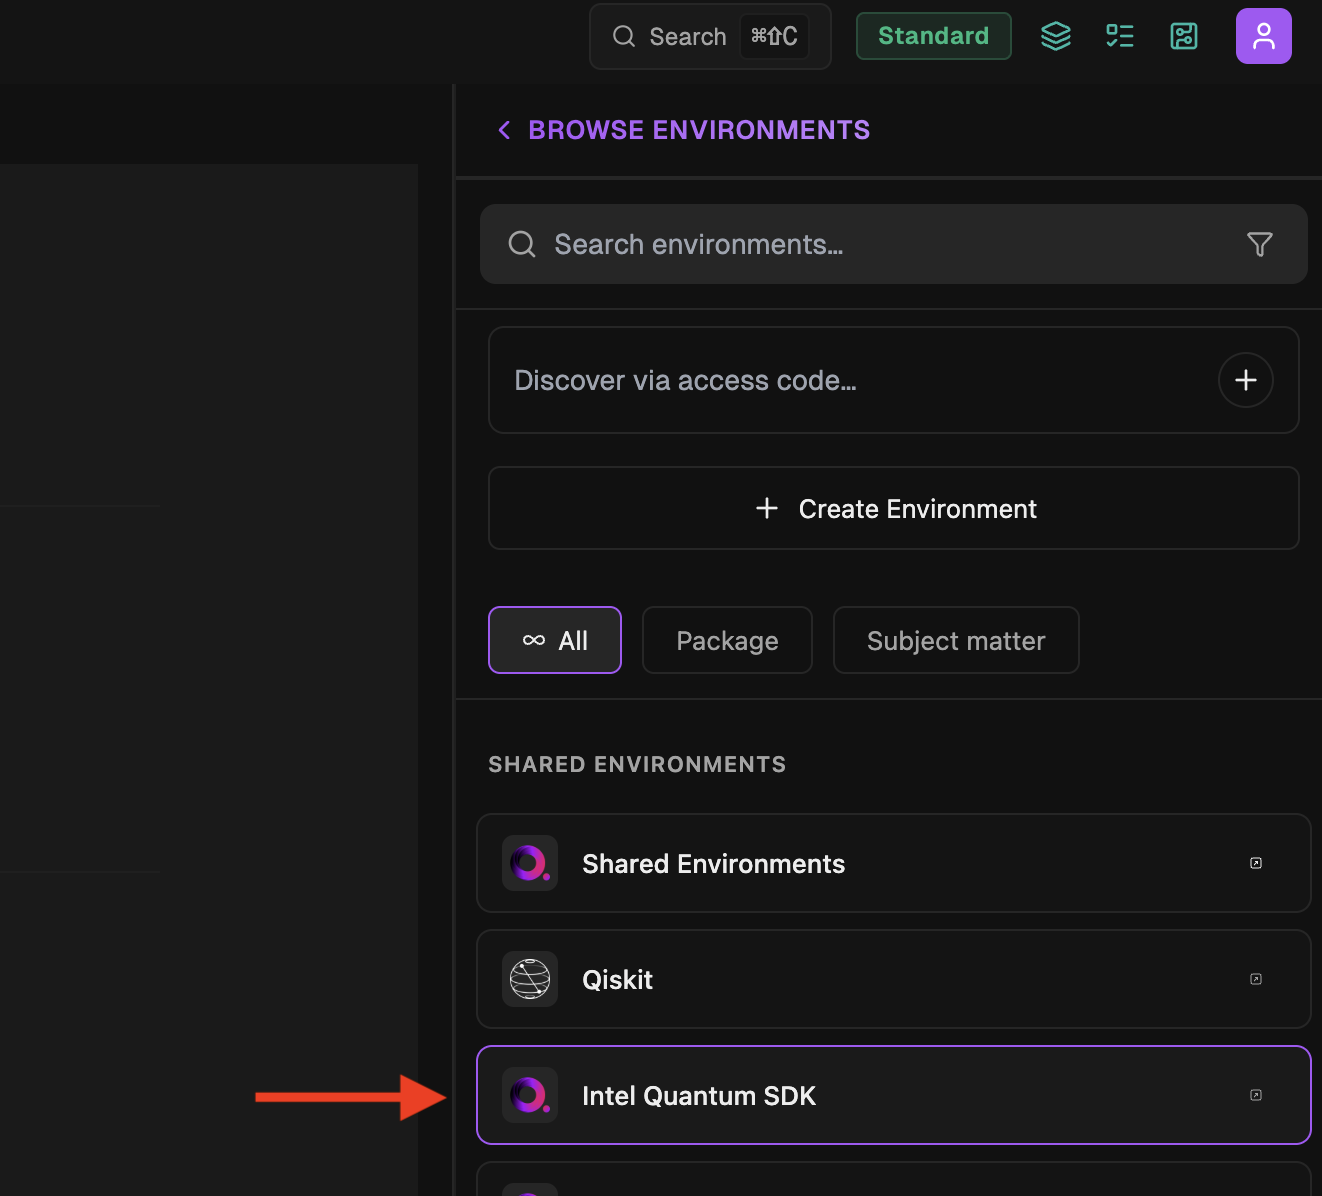
Environments are organized into groups. Select the Intel Quantum SDK group — the environment does not appear in the top-level list until you open its group.
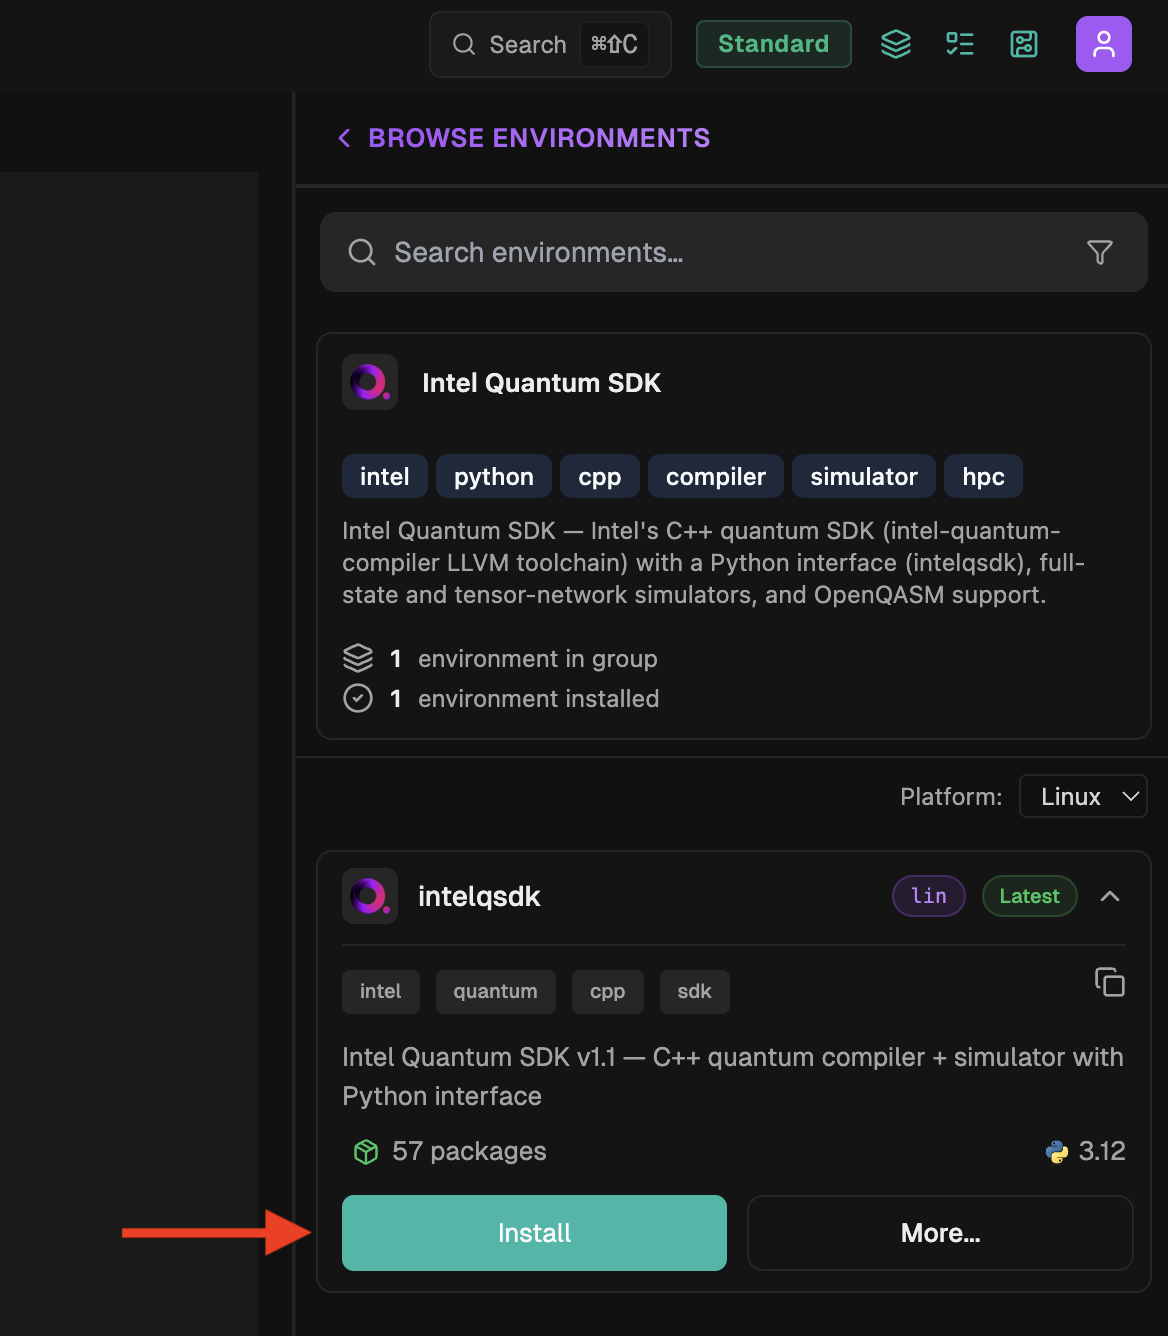
- Inside the group, expand the intelqsdk environment panel and click Install. Installation
adds a dedicated Python virtual environment under
~/.qbraid/environments/.
Prefer the terminal? The same environment can be installed with the qBraid CLI. Use
qbraid envs available to look up the environment (listed as intelqsdk) and its slug, then install
it:
qbraid envs available              # find the intelqsdk environment and its slug
qbraid envs install intelq_r7zabv  # install by slug
Once installed, the environment is fully self-contained: the intel-quantum-compiler, the simulator
backends, the Intel MKL / MPI / OpenMP runtime libraries, and a dedicated Python interpreter all live
inside it. There is no separate pip install or source step, and nothing is drawn from a
system-wide Intel installation.
Add the kernel
When the installation completes, the intelqsdk panel moves to the Environments tab and its action button switches from Installing… to Add kernel. Click it to register the Python 3 [Intel Quantum SDK] Jupyter kernel, which you will select when running notebooks.
From the terminal, the kernel can instead be added with the CLI (find the environment ID with
qbraid envs list):
qbraid envs list          # note the intelqsdk environment ID
qbraid kernels add <envId>
Python Interface
The Python interface (intelqsdk.cbindings) lets you write a quantum_kernel in C++, compile it, and
drive it entirely from Python. When you use the Python 3 [Intel Quantum SDK] kernel — or the
environment’s python3 — the compiler is placed on your PATH and the IQSDK_SHARE environment
variable points at the SDK installation, so you can locate the compiler without hard-coding any paths.
Before running a notebook, make sure the Intel® Quantum SDK kernel is
active, and that it is
selected for the current notebook via the
kernel picker in the top-right of the menu bar (Python 3 [Intel Quantum SDK]).
The following example creates a two-qubit Bell state and prints the resulting probabilities:
import os

import intelqsdk.cbindings as iqsdk

# The environment exposes the compiler location via IQSDK_SHARE.
compiler = os.path.join(os.environ["IQSDK_SHARE"], "intel-quantum-compiler")

num_qubits = 2

# Python-interpolated C++ source defining a Bell-state quantum kernel.
bell_source = f"""
#include <clang/Quantum/quintrinsics.h>

qbit q[{num_qubits}];

quantum_kernel void bell() {{
    PrepZ(q[0]);
    PrepZ(q[1]);
    H(q[0]);
    CNOT(q[0], q[1]);
}}
"""

with open("bell.cpp", "w", encoding="utf-8") as output_file:
    output_file.write(bell_source)

# Compile to a shared object and register it under the name "bell_sdk".
iqsdk.compileProgram(compiler, "bell.cpp", "-s", "bell_sdk")

# Configure and start the full-state Intel Quantum Simulator.
iqs_config = iqsdk.IqsConfig()
iqs_config.num_qubits = num_qubits
iqs_config.simulation_type = "noiseless"
iqs_device = iqsdk.FullStateSimulator(iqs_config)
iqs_device.ready()

# Run the "bell" kernel defined in the C++ source above.
iqsdk.callCppFunction("bell", "bell_sdk")

# Collect references to the qubits and print their probabilities.
qbit_ref = iqsdk.RefVec()
for i in range(num_qubits):
    qbit_ref.append(iqsdk.QbitRef("q", i, "bell_sdk").get_ref())

probabilities = iqs_device.getProbabilities(qbit_ref)
iqsdk.FullStateSimulator.displayProbabilities(probabilities, qbit_ref)

# Printing probability register of size 4
# |00> : 0.5                             |10> : 0
# |01> : 0                               |11> : 0.5
Ready-to-run examples are bundled inside the environment at $IQSDK_SHARE/python-quantum-examples/
(run_ghz.py, run_qft.py, run_tfd_demo.py). Copy one into your workspace to try it:
import os
import shutil

shutil.copy(
    os.path.join(os.environ["IQSDK_SHARE"], "python-quantum-examples", "run_ghz.py"),
    ".",
)
OpenQASM support
The environment ships a source-to-source converter that turns OpenQASM 2.0 into Intel® Quantum SDK C++. The translator requires Python >= 3.10 and currently supports OpenQASM 2.0 as described in arXiv:1707.03429.
From Python, use the openqasm_bridge to translate a circuit into a C++ quantum_kernel source that
you can compile exactly as above:
from openqasm_bridge.v2 import translate

qasm_source = f"""
OPENQASM 2.0;
qreg q[{num_qubits}];
creg c[{num_qubits}];
h q[0];
cx q[0],q[1];
measure q[0] -> c[0];
measure q[1] -> c[1];
"""

# Returns C++ source lines; join them and write out a .cpp file to compile.
translated = translate(qasm_source, kernel_name="bell")
with open("bell.cpp", "w", encoding="utf-8") as output_file:
    output_file.write("\n".join(translated))
Alternatively, translate an OpenQASM file directly from the terminal with the compiler’s -B flag,
which writes the corresponding C++ quantum_kernel source:
intel-quantum-compiler -B bell.qasmIf you start from a Qiskit circuit, export it to OpenQASM 2.0
first (from qiskit.qasm2 import dumps; qasm_source = dumps(circuit)), then feed the result to the
translator. This requires Qiskit to be installed in your working environment.
Advanced: Compiler and C++ Interface
Advanced users can work directly in C++ and drive the intel-quantum-compiler from a terminal. A
quantum_kernel program can be compiled to a standalone executable and run without Python.
Set up a terminal session
The environment’s python3 wires up the compiler and runtime libraries automatically, but a plain
terminal session does not. For a pure C++ workflow, add the compiler to your PATH and the Intel
runtime libraries to your LD_LIBRARY_PATH. Find your environment’s path with qbraid envs list and
substitute its ID below:
ENV=~/.qbraid/environments/intelq_xxxx/pyenv
export PATH="$ENV/share/iqsdk:$PATH"
export LD_LIBRARY_PATH="$ENV/lib:$ENV/share/iqsdk/lib:$ENV/share/iqsdk/iqc/lib:$LD_LIBRARY_PATH"
Compile and run a C++ quantum kernel
Save the following as bell.cpp. Unlike the Python interface, a standalone program provides its own
main() that configures the simulator and reads out results:
#include <clang/Quantum/quintrinsics.h>
#include <quantum_full_state_simulator_backend.h>

#include <iostream>
#include <vector>

qbit q[2];

quantum_kernel void bell() {
  PrepZ(q[0]);
  PrepZ(q[1]);
  H(q[0]);
  CNOT(q[0], q[1]);
}

int main() {
  iqsdk::IqsConfig config(/*num_qubits=*/2, "noiseless");
  iqsdk::FullStateSimulator sim(config);
  if (iqsdk::QRT_ERROR_SUCCESS != sim.ready())
    return 1;

  bell();

  std::vector<std::reference_wrapper<qbit>> qids;
  for (int i = 0; i < 2; ++i)
    qids.push_back(std::ref(q[i]));

  auto probabilities = sim.getProbabilities(qids);
  iqsdk::FullStateSimulator::displayProbabilities(probabilities, qids);
  return 0;
}
Compile it to an executable and run it:
intel-quantum-compiler -o . bell.cpp   # -o names an output DIRECTORY, not a file
./bell
Printing probability register of size 4
|00> : 0.5 |10> : 0
|01> : 0 |11> : 0.5Compiler options
The intel-quantum-compiler differs from a standard C++ compiler in a few important ways:
-o <dir>— write output to a directory (not a file name). The executable or shared object is named after the input file.-s— build a shared object (.so) instead of an executable. This is what the Python interface uses under the hood.-B— translate an OpenQASM 2.0 input file into a C++quantum_kernelsource file.-f <flag>— forward a flag to the underlying Clang compilation, e.g.-f -DMY_MACRO.
Run intel-quantum-compiler --help for the full list of options. Additional ready-to-run C++
examples are bundled under $IQSDK_SHARE/quantum-examples/, and the Intel® Quantum SDK reference
documentation (PDFs and Doxygen API HTML) is under $IQSDK_SHARE/docs/.
Enjoy exploring the possibilities of quantum computing with the Intel® Quantum SDK.
Thanks for your feedback.